Latest News
Any MicroFoundry user is invited to show their castings in this News gallery, with the intention of encouraging beginners to the small scale foundry craft. Adding a short text and perhaps one photo showing any novel technique used to create the wax pattern might also be helpful.
June 2020
Making small Silver & Bronze features to add to your ring / pendant castings.
Having been asked How do I make the small 'Zodiac' features shown in some rings in the website gallery?, here is a short tutorial based on part of the Compucut Mouldmaking course. It is intended for those MicroFoundry users who live outside UK and more recently, UK casters who are 'locked out' of Compucut courses due to Covid.
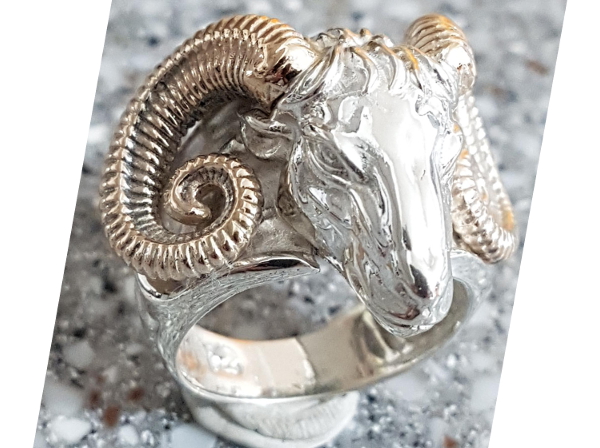
The attraction of these features is that they can contrast with the cast metal backing or inlay in a ring or pendant etc. A silver feature in a gold or bronze ring or a bronze feature in a silver ring looks well (IMO). Examples are shown below.
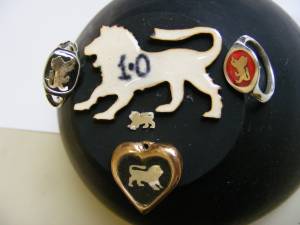
The scale 1.0 shape above was the drawn design which was scanned, the resulting metal features can be any scale. The central silver Leo is 1/5 scale at 7.5mm nose to tail.
This is not the traditional or only way of making these features, but sawing, filing, drilling a specific (recognisable) subject such as a Lion from silver sheet at a scale down to 8mm 'nose to tail' requires much patience, good eyesight and a high level of craft skill only likely to be found among trained jewellers / engineers. Compucut have devised an alternative technique, more appropriate for newcomers, which uses some 21st century technologies that have now trickled down to the 'hobby' level. A 10-year old PC, a standard printer/scanner and a 3-watt desktop Laser diode engraver can be used to make accurate, 1-time moulds for sintered metal clay features. These desktop laser diode engravers are Safe and Easy to use. All the required hardware is now relatively cheap, widely available and fun to use in this application.
The computer involvement can be very basic, requiring little more than importing a photo file from your camera, or scanning a B/W photo or your own B/W drawn silhouette, to create a JPG image file which is then sent to the Laser to cut out the mould from 1mm sheet. Once the cutting file has been created and saved, multiple moulds can be cut in a few minutes at any scale required with no further computer involvement on the part of the user.
The mould is then loaded with metal clay and after drying in the BFJ, the clay is then sintered in the MFJ to reproduce the original 2-D shape, scaled down in fine silver, bronze or gold.
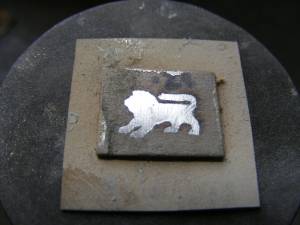
- Design: Easiest for a first try, is to draw a simple one-piece B/W silhouette about A6 size. Use a dense black marker pen to fill in the profile drawn with a black OHP pen for good definition & contrast on a white sheet. Scan this to give a JPG image file.
- Mould Cutting: Assuming you have bought a cheap 'raster' based Laser engraver of at least 3-watts, set
up as makers instructions, connect to USB of your PC and enter your .jpg B/W file. Use the basic editor
that comes with the Laser package to scale your image to fit into about 15mm x 15mm.
Place a piece of 480gsm untreated card 1mm thick under the laser, focus the beam and cut out a test piece. Depth and Power settings are found by trial and error. You may need two passes at lower depth setting to give the narrowest kerf (cut width) for highest detail. I use the card made for producing beer mats.
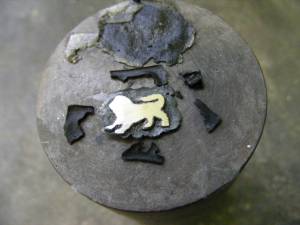
- Moulding: Load the cutout mould with Metal Clay, silver is slightly easier to work than bronze, but is more
expensive for trials. I suggest Prometheus 'Sunny Bronze' as an inexpensive starter. If choosing silver,
Mitsubishi PMC 3 works well, both these modern clays are rated as 'Low Fire' temperature types.
Leave the mould to air dry for 30-minutes and then re-skim with a thin layer of extra clay as required to leave an excess of about 1/4mm on each side of the mould. If skimming was needed, leave a further 15-minutes to air dry.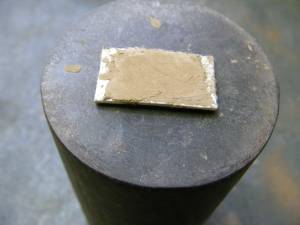
- Drying: Put a layer of finely granulated charcoal 3mm deep into the cold
(<40°C) BFJ burnout furnace, and level
it off. Place the mould/clay onto the charcoal and cover with 3mm of charcoal. Don't use a ceramic fibre
mat, place the top of the MFJ melting furnace on the BFJ and heat at 100w for 20 minutes to dry the clay and
loosen the clay/mould bond.
Carefully file the clay down flat to the mould on each side using a new (sharp) 6-inch second cut file.
Avoid flexing the mould as clay, particularly the bronze is not flexible.
- Sintering: Put 3mm of charcoal into the cold MFJ and level it off. Place
the remains of the mould and the dried clay onto the charcoal and cover with a 3mm layer. Don't use a
crucible cover or ceramic mat, place the MFJ top on, and heat for 25 minutes at 200 watts. The charcoal
will just show dull red beneath the top skin. Empty into a metal dish and then quench the item. Use a
scriber to pick out any remnants of the mould. The charcoal is re-usable.
- Finishing: The item will not be flat at this stage, debur the concave side
first, then place concave side down on the metal bench block and planish to flatten the bottom edge, this
will provide the locating face onto the ring. The planishing is the test of the sintering process,
the item should allow any degree of planishing without fracture, and any crumbling shows an
under heat during the sintering stage, in this case try 30 minutes next time,
microwave ovens vary in power / efficiency and you will need to find the best time for yours. It is quite
certain that in finding the best time in your oven, you will melt an item or two.
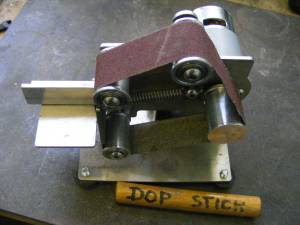
File, sand or linish on a dop until flat and then polish to finish the feature. The item can finally be silver
soldered into the ring / pendant, set in with clear or tinted epoxy resin or set into an enamel inlay.
That's it, although a further Step 7 might be breaking the addiction !! I have been sintering these tiny features this way for years and it can (has) become very addictive. Smaller, with more detail is always the challenge, my smallest Leo (silver in group photo 1) is 7.3mm nose to tail and this is about my limit.
Anyone is welcome to send a photo of their featured jewels (large or small) for including in the MicroFoundry News on this site.
Have fun !! Richard
May 2020
Shown here are two of Lee Lawson's silver ring castings, produced with a MicroFoundry kit using vacuum assistance.

Well cast Lee, they are lovely !!